We had move to the next stage of the lesson which is PHP. In this post, I will talk about creating database and tables using PhpMyAdmin. Below is the step by step of creating database and table using PhpMyAdmin. But, before proceed with creating the database, make sure xampp has been installed to your laptop or PC. If you have not installed it yet, please go and get the installer for xampp. It can be download for free. :)
Now, I will proceed with the steps of creating database.
1. If you have Internet Information Services being installed in your machine (PC or laptop) make sure you have stop it first because if it is running XAMPP will not able to connect with port 80 as IIS used the same port. To stop the IIS just go to Control Panel > System and Security > Administrative Tool > Internet Information Services (IIS) Manager > Stop. Below is the interface of IIS Manager for Windows 7. The stop button is on the right hand side.
IIS Manager interface for Window 7.
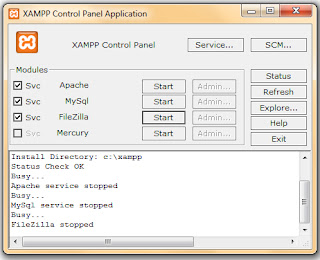
2. Open your XAMPP control panel application. Click the start button for Apache and MySql. Below is the interface for XAMPP control application.
XAMPP Control Panel Application interface. Click start to activate Apache and MySql.
3. After that, open your browser (any web browser) and I am using Google Chrome. Type "localhost" in the address column. The interface of XAMPP will appear. Select your language.
XAMPP interface
4. I select English for language and the interface below appear.
XAMPP for Windows interface.
From the interface above, you can see the menu on your left hand side. Please go through and search for phpMyAdmin which is under the menu for Tools. Click phpMyAdmin. Below is the interface for phpMyAdmin.
5. From picture above, there is column for Create New Database. Here, you will create your database.
Type in your database name. I name my database as data. Then click create.
6. After that, it will direct you to the page which you will create your table. The interface is as following.
Look at the bottom of the picture above, you can see the Create new table on database data. In the column please type in your table name. In the column for Number of fields please type number of attributes for your table. Name, surname or email are the examples of attributes. For my table, I name it as form and there are six (6) fields in the table. Then click GO.
7. After that, table will appear. Fill in the table.
For my table, in the first column I set it for id, type: INT, and I set it as a primary key. Length is 50.
Second column is for surname, length:100 type: VARCHAR.
Third column: firstname, length:100, type: VARCHAR.
Fourth column: email, length: 100, type: VARCHAR
Fifth column: website, length: 100, type: VARCHAR
Sixth column: message, length: 500, type: VARCHAR.
Then click SAVE.
8. Now, you had create your database and table.
That all for now. Thank you.


0 comments:
Post a Comment
If you have any questions please comment below.